
Ladder safety can be the difference between finishing the shift and a trip to the ER. A failing ladder often gives warning signs first, such as hairline cracks, bent rails, loose spreaders, slick rungs, or worn feet. Sun damage on fiberglass, hidden corrosion on aluminum, and weeks of concrete dust or paint overspray all speed up wear. In this guide, we’ll walk through how to inspect a ladder with simple checks you can do in under a minute, share signs a ladder is unsafe, and explain when to tag it out or scrap it. We’ll also cover storage and cleaning habits that slow damage and extend service life.
If you supervise crews or climb yourself, build these steps into your routine and make ladder safety an everyday habit.
The importance of ladder safety
Ladder-related injuries are common—and preventable. The NASP reports that in 2023, portable ladders and stairs were the primary cause of 109 fatal work injuries in the construction industry.
More broadly, the American Academy of Orthopedic Surgeons reported that 500,000 people were treated for ladder-related injuries in the U.S. in 2023, illustrating how routine tasks can turn serious when equipment is compromised. Early inspection catches problems before a rung slips, a hinge gives way, or a foot skates across smooth concrete.
OSHA expects employers to incorporate ladder inspection into the job. They require that “ladders are inspected before initial use in each work shift, and more frequently as necessary, to identify any visible defects that could cause employee injury.” Employers are required to ensure that every ladder is checked before use. Portable ladders must be inspected by a competent person for visible defects periodically and after any occurrence that could affect their safe use.
Signs a ladder is unsafe
Every day wear, hard knocks, and poor storage are the usual culprits. Common failure paths include:
Structural damage
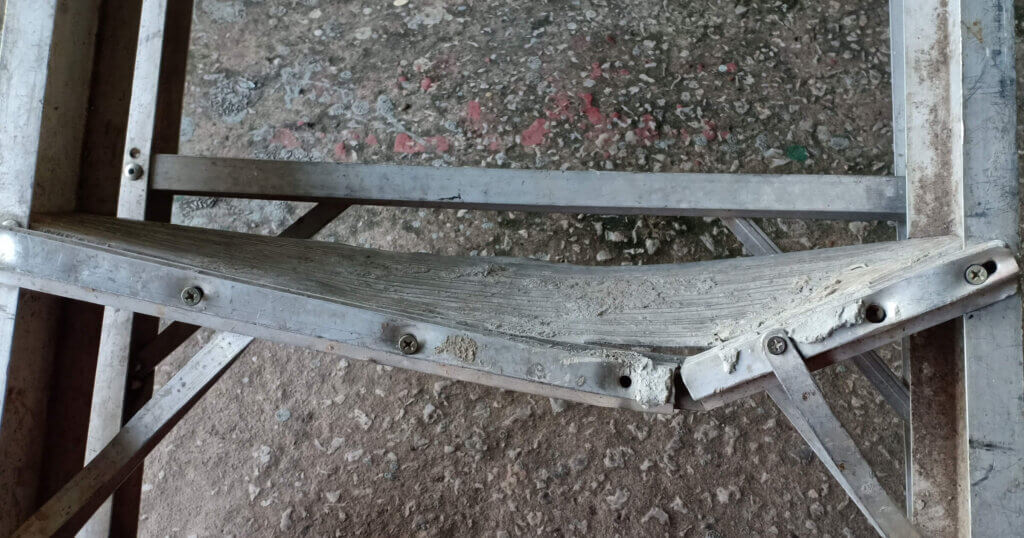
Photo courtesy of https://www.shutterstock.com/
A ladder with bent side rails has already lost strength; metal “springs back” only in movies. Don’t try to hammer bends straight—doing so weakens the rail even more. Look closely around rivets and bolt holes for hairline cracks; they often radiate outward and lengthen under load. Missing or loose rungs, steps, cleats, or spreaders are immediate red flags that warrant removal from service. Structural damage, split/bent side rails, broken or missing rungs/steps/cleats, and damaged safety devices are defects that require action.
Corrosion, rust, or decay
Moisture eats at metal hardware and ladder shoes, especially where salt, de-icer, or fertilizer are present. Rust that flakes at joints or welds is more than cosmetic; it thins the section and can let a hinge or foot fail under load. Aluminum doesn’t rust, but it corrodes—watch for pitting and white oxidation, particularly where dissimilar metals meet. Wood ladders (now less common) split and swell when coatings wear off, and the end grain remains wet. Any decay near a fastener spreads stress and invites failure the moment you shift your weight.
Slippery surfaces or hidden buildup
Rungs and steps rely on an intact tread. Once the pattern is worn smooth—or caked with drywall mud, oil, or overspray—traction goes away, especially with wet boots. OSHA’s stepladder guidance calls out grease, dirt, or other contaminants that could cause slips or falls, and warns that paint or stickers (other than safety labels) can hide defects you need to see. If you can’t restore clean, textured contact with a brush and mild detergent, take the ladder out of service.
Worn feet that turn to hard plastic/metal and slide on smooth floors
Ladder feet are the foundation of stability, designed to grip floors and prevent slipping. Over time, the rubber or soft material can wear down, exposing hard plastic or metal underneath. On smooth surfaces like polished concrete, tile, or wet flooring, this worn surface loses traction, making slips more likely. Even a slight shift in position can cause the ladder to slide unexpectedly, posing a serious risk to the user. Inspecting the feet before each use and replacing worn or damaged caps ensures that the ladder maintains a secure hold. Small changes here can make a big difference in preventing falls.
Overloading beyond the duty rating printed on the label
Every ladder comes with a duty rating that indicates the maximum weight it can safely support, including both the user and any tools or materials they may be carrying. Ignoring this limit puts extra stress on the rails, rungs, and hinges, which can bend, crack, or fail entirely. Overloading can also cause the ladder to wobble, even if it doesn’t break immediately, creating a hazardous situation. Following the labeled weight limits protects both the ladder’s structure and the person using it. Always factor in your tool belt, paint buckets, or equipment when calculating the load. Adhering to the rating is a simple step that prevents catastrophic accidents.
Improper storage
Ladders that are left outside or stored improperly degrade faster than those kept in a controlled environment. UV rays from sunlight can weaken fiberglass, making it brittle. Rain and moisture accelerate corrosion on metal ladders and can cause wood to rot. Leaning a ladder against a fence or wall for extended periods may also cause the rails or rungs to warp or bend, even if it appears fine on first glance. These small changes in structure can turn a ladder that looks usable into one that’s unsafe under load. Storing ladders indoors, off the ground, and in a shaded or protected area preserves their integrity. Taking a few minutes to store your ladder properly pays off in safety and longevity.
How to inspect a ladder before use
when it comes to knowing how to inspect a ladder properly, think “bottom to top, then function test.” This 30–60 second routine pays off every time.
Start with the feet and base
Set the ladder on a clean, flat surface. Check that the feet are present, intact, and grippy, not hardened, torn, or missing. Shoes on extension ladders should pivot freely and sit flat on the ground; seized shoes won’t adjust to grade and can kick out. Look for embedded gravel or metal shavings in the pads that reduce traction. If feet are worn to plastic or metal, tag the ladder out.
Examine rungs, bolts, and rails
Run a hand and eye along both rails: no bends, dents, cracks, splinters, or soft spots. On fiberglass, chalky or powdery surfaces indicate UV degradation; the strength of the resin drops as it breaks down. Check each rung or step for looseness or deformation, and confirm that the anti-slip tread is there and clean. Verify bolts, rivets, and rung-to-rail joints are snug with no gaps or elongation at holes.
Check that all moving parts are working smoothly
Open a stepladder fully and confirm that the spreaders’ lock is secure with no slop at the hinges. For extension ladders, ensure that the rung locks engage completely and sit squarely on the rungs without wobbling. Inspect the rope and pulley—the rope shouldn’t be frayed or stiff, and the pulley should turn smoothly. Any cracking, kinking, or broken strands in the rope indicate that it needs to be replaced before use.
Test the ladder’s feel
With the ladder set as you’ll use it, load it lightly. Step onto the first rung or two and gently shift weight. Watch for twist, side play, or a hinge that “pops.” If the wobble originates from the ground, reset the ladder’s position. If it comes from the structure (loose spreaders, bent rail, sloppy locks), stop. Trust your instincts—if it doesn’t feel right, it isn’t right. OSHA’s standard puts the duty to inspect on a competent person, but every climber should treat this as personal PPE.
When to repair, tag, or retire a ladder
Some faults are fixable with manufacturer parts; others are a hard stop.
- Repairable (with OEM parts only): Worn feet/shoes, ropes, rung locks, or spreaders that are otherwise undamaged.
- Tag and remove from service: Any cracked or bent rail; broken or missing rungs/steps; loose or missing fasteners that won’t hold torque; excessive corrosion; UV-brittle fiberglass; or slick rungs that can’t be cleaned back to texture.
- Repeated inspection failures: If the same ladder keeps failing checks, retire it.
- Missing labels: If the duty rating/weight label or electrical safety marking is missing or unreadable, treat the ladder as suspect until it is relabeled according to the manufacturer’s instructions.
- OSHA language is clear: Ladders with structural defects must be withdrawn from service and either repaired or replaced; periodic inspections are required, as well as inspections after any event that could affect their safe use.
How to make your ladder last longer
- Clean it properly: Wipe down rails and rungs with mild detergent and water; remove grease, paint, drywall mud, and concrete dust that hide cracks and defeat tread. OSHA cautions that contaminants increase the risk of slips and falls.
- Store in a dry, shaded space: Keep ladders off the ground, out of the rain, and out of direct sun. Fiberglass resin degrades under UV and turns chalky; aluminum hardware corrodes in damp corners of the shop.
- Schedule regular inspections: Do a daily quick check before use and a documented monthly check as part of your safety program. Tag anything questionable and follow up before it is reinstated. OSHA expects periodic inspections by a competent person.
- Don’t throw it on the ground after use: Impacts bend rails and loosen fasteners. Lower ladders with a spotter when possible and rack them horizontally with support at several points to prevent sagging.
- Protect moving parts: Keep rung locks, hinges, and pulleys clean and lubricated. Replace frayed ropes. If a moving part binds, don’t “muscle it”—find out why.
- Match the ladder to the task: Use the correct duty rating and type (non-conductive fiberglass near live electrical sources). Overloading a light-duty ladder shortens its lifespan and increases the risk.
Final safety reminder
Minor defects are loud warnings. Making sure you know how to inspect a ladder properly so you keep your crew members safe. A ladder that wobbles, clicks, binds, slips, or looks off isn’t a maybe—it’s a no. Treat inspection like buckling a harness or donning a helmet: it’s a habit that takes seconds and prevents weeks of downtime. Build these checks into your toolbox talk, and make it normal to tag out suspect gear without debate. The safest climb is the one you decide not to take on a failing ladder.
Want more practical safety reads for the job site? Check these out:
- Construction dust safety tips
- Prevent construction accidents with job hazard analysis
- Safety helmet vs hard hat
- How effective safety communication can save lives on the job site
If you found this useful, subscribe to our newsletter for straight-shooting safety tips, gear guides, and field-tested checklists.